About this course;
|
|

|

|

|
I have researched all of this on the internet to get an insight of what this course is about.
GCSE photography is about getting used to using photographic equipment and taking different type of photo's whether it's using a camera or whether it is just using paper and objects like the making of the cyanotypes (see unit 1 for this in techniques and processes). Doing this as a GCSE course gives you an insight of photography related careers like advertising, graphic design, and scientific photography. You can find out things that you wouldn't normally find out in your out of school life like how to change or improve photographs; This can improve your independant learning skills and determines whether you can cope or not with complicated procedures.
GCSE Photography can lead to Further Education in the 6th Form and at College. coursework 60% of the marks:
A coursework unit should include preparatory work, sketch books, development
work related to the final photograph(s) in the chosen area(s) of study.
Exam 40% of the marks:
Candidates will be required to respond to one starting point
in their chosen option. Starting points will be set by OCR.
There will be a preparatory period, followed by 10 hours of supervised time
(usually split over 2 days).
Candidates will be expected to develop their own work to resolve their
investigations, producing a final piece or pieces based upon preparatory studies
and research.
Possible photography careers:
Wedding Photographer Lecturer AS/A2 in Photography
Studio photographer Teacher Art foundation course
Forensic photographer Photo developer BTEC in Art and design
Graphic designer Lab technician Many different degrees in photography
Photography is used in a variety of different professions where good visual communication is vital. Newspapers, magazines, film, television, books and the internet use photography as do industry, medicine, business and research. Photography is more than pointing a camera and pressing the button. You will need to be prepared to learn how to take a good photograph using a digital camera and traditional methods of Photography. You will learn about the technical processes involved, such as how to develop a film, how to use a dark room and print your own black and white prints. You will look at other peoples’ photographs and learn about the history of photography. You will also develop your ICT skills using Photoshop software.
Information you may want to know!......
10 tips for taking photos:
Get in close....
1. Sometimes close or tight shots are good for capturing expressions or atmosphere. when capturing images, focas on what you want you want to show and eliminate distractions from the background. If you end up taking a picture of someone make sure you get their permission first! Here are some pictures that I found on bbc bitesize in the photography section.

|
This is same person in each photo but the first photo was from a distance of a man talking on the phone and the second photo is the same man on the phone but you can see his expressions more clearly because it is close up.
|
Fill the frame.....
2. To create interesting photographs, you need to fill the frame and minimise the
amount of dead space. The first rule is to get in close. This will help you to capture emotion that wouldn't be detectablenoticable from far away.
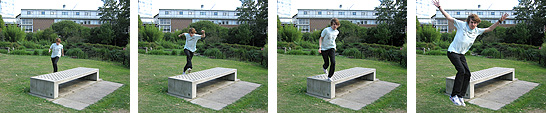
Take action shots.....
3.Capturing action shots requires practise. You could practise capturing images
of footballers in action. Take lots of pictures to see if you
can capture a player making contact with the ball.
Some cameras have a function called 'continuous mode' that
allows you to take several photos in quick succession. This is great for taking
action shots. For example this picture is off of bitesize and it is taking action shots and in continuous mode.
2. To create interesting photographs, you need to fill the frame and minimise the
amount of dead space. The first rule is to get in close. This will help you to capture emotion that wouldn't be detectablenoticable from far away.
Take action shots.....
3.Capturing action shots requires practise. You could practise capturing images
of footballers in action. Take lots of pictures to see if you
can capture a player making contact with the ball.
Some cameras have a function called 'continuous mode' that
allows you to take several photos in quick succession. This is great for taking
action shots. For example this picture is off of bitesize and it is taking action shots and in continuous mode.
Choose a focal point.....
4. The focal point is the most interesting object/person in your
photograph. Any more than one focal point looks cluttered. For example this image below on the right has a clearer focal image than the cluttered image on the left.
4. The focal point is the most interesting object/person in your
photograph. Any more than one focal point looks cluttered. For example this image below on the right has a clearer focal image than the cluttered image on the left.
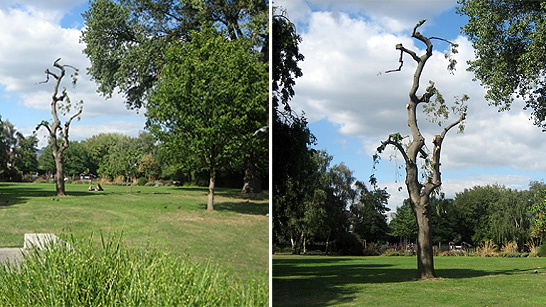
There are too many focal points (people, trees, bench) in the first image shown
above, whereas the second image shows the tree as the clear focal point.
Arrange your subjects.....
5. Arrange your subjects to ensure you translate what you want the audience to
focus on. Use plain backgrounds. Be selective. If your object
is in front of a messy background, move it until you are satisfied with the
shot. This picture below is of fruit and as you can see below the left image has a cluttered background therefore it takes the focus away from the fruit.

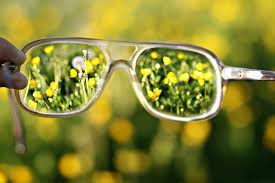
Think about composition.....
6. Cameras view things differently to the human eye. Cameras have a limited focus
range whereas the eye is constantly scanning scenery, recomposing it, (making it again/differently) and responding to changes in light conditions. Cameras have a much narrower exposure (something being uncovered) range than the human eye.
Apply the rule of thirds.....
|
7. Photographs with the focal point exactly in the centre can lack depth and
interest, so it's better to position your focal point off-centre. To do this, apply the rule of thirds. Draw two horizontal and two vertical lines through the picture you want to capture. The eyes are naturally drawn to the four focal points illustrated in red above, so place the important elements of your picture on one or more of these points. |

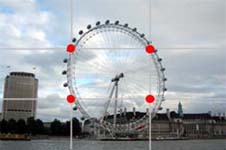
image 1, bad way to do it , it is around th ecentre point and so it has lack of depth
|
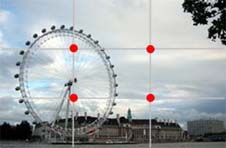
image 2, good way to do it because is isnt in the middle and most eyes are drawn to the four red dots (four focal points)
Now you have see the two images above Compare them both. A focal point placed in the centre often just looks boring, so avoid placing your focal point in the centre. You will see this rule being applied in any magazine you look at.
Think about light.....
8. Most cameras have an automatic flash that works when there
isn't enough natural light. Experiment with the flash to work out its depth or range.
Also think about natural light, especially outside. Try to make sure the
sun/light source is behind you most of the time , or focussed on your
subjects.
Be aware that strong bright light will show up people's wrinkles and
blemishes (small marks that spoil the look of something.) Similarly, try to take pictures of landscapes in early morning or early evening because the light is softer.
Vary your shots.....
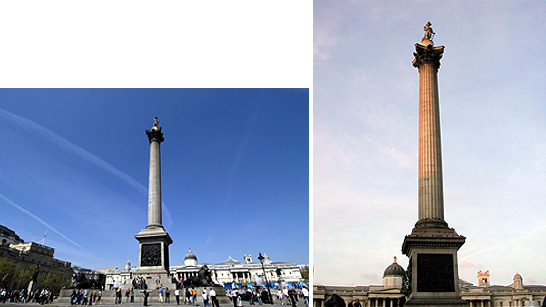
9. Experiment with using your camera horizontally and vertically. A photograph of
Nelson's Column ( A statue to commemorate lord nelsons death,he had a victory at trafalger), for example, would be ideal for a vertical shot.
Think about light.....
8. Most cameras have an automatic flash that works when there
isn't enough natural light. Experiment with the flash to work out its depth or range.
Also think about natural light, especially outside. Try to make sure the
sun/light source is behind you most of the time , or focussed on your
subjects.
Be aware that strong bright light will show up people's wrinkles and
blemishes (small marks that spoil the look of something.) Similarly, try to take pictures of landscapes in early morning or early evening because the light is softer.
Vary your shots.....
9. Experiment with using your camera horizontally and vertically. A photograph of
Nelson's Column ( A statue to commemorate lord nelsons death,he had a victory at trafalger), for example, would be ideal for a vertical shot.
Know when to break the rules.....
10. Once you have mastered these rules, you can then begin to break them. With
digital photography, it's easy to take lots of pictures, so don't be afraid to experiment. If you can create an unusual image, it's likely that people will be interested in it.
10. Once you have mastered these rules, you can then begin to break them. With
digital photography, it's easy to take lots of pictures, so don't be afraid to experiment. If you can create an unusual image, it's likely that people will be interested in it.
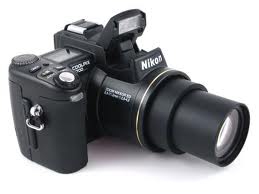
Getting to know your camera.
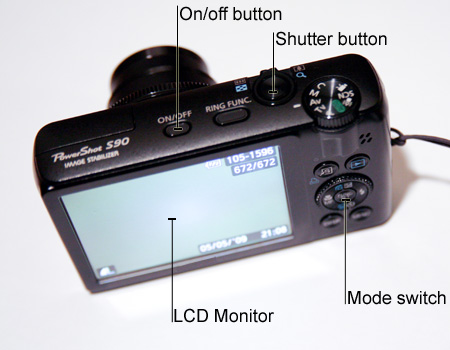
Although some settings differ on cameras, most have the same basic functions. The diagramme and table below show the most common components and functions.
Components and functions:
On/Off button
This obviously Turns the camera on and off. Some digitial cameras will have a power-saving mode that automatically turns the camera off when it's not in use.
Shutter button
If you want to do this all you have to do is Press this on button to take a photograph. Most cameras have an auto-focus function that is operated by holding the shutter button halfway down. You then press the
button all the way down to take the photograph.
Mode switch
This allows you to switch between the different modes of the camera - still
photograph, video clip, or view photos.
LCD monitor
This is to View your shot and playback photographs and video clips. You can also change
the settings of the camera using the LCD monitor.
For more information on basic camera functions, watch this video from the Bitesize
Art and Design section.
